Unknown's avatar

About PC Paramedic, Inc.

I am computer technician and have been working in the field for over 25 years. I grew up with computers at home and we had them before my school had any.

command to modify ACL (Access Control List)

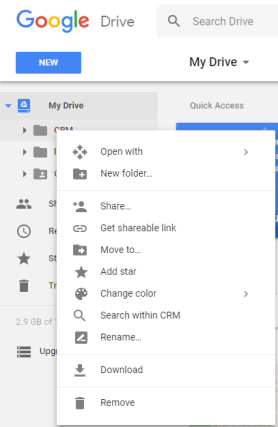
Since you are not in the Access Control List(ACL) of the “System Volume Information” folder you don’t have the right to look at its content.

http://www.techimo.com/forum/applications-operating-systems/61969-answer-system-volume-information-access-denied-question-also-system-restore.html

—————————

Excerpt:

enter the following command while having sufficient permissions (being the only user of a machine or logging in as administrator should be sufficient)

cacls “System Volume Information” /E /P Leon:F

to change it back the way it was before, enter the following on a line by itself, and press Enter

cacls “System Volume Information” /E /R Leon


https://ss64.com/nt/icacls.html

Propagate a new permission to all files and subfolders of C:\demo\example\, without using inheritance:
(so if any of the subfolders contain specific permissions, those won’t be overwritten)

icacls “C:\demo\example” /grant:r accountName:(NP)(RX) /T

How to Rip a DVD to Your Computer


https://lifehacker.com/how-to-rip-a-dvd-to-your-computer-5809765

  1. Head to Handbrake’s homepage and download the program. Install it to your computer as directed.
  2. By default, Handbrake can rip unprotected DVDs, but most DVDs you buy from the store have copy protection. To get around this, you’ll need to install libdvdcss. On Windows, you can download this file separately (here for 32-bit systems and here for 64-bit systems), rename it to libdvdcss.dll leave the filename as libdvdcss-2.dll, and put it in your Handbrake program folder (C:\Program Files\Handbrake). If you’re on a Mac, download this file and double-click to install it. If you’re running OS X El Capitan, you have a few more steps—head to the bottom of this article before doing anything else.
  3. Insert the DVD you want to rip, and open Handbrake.
  4. Click the Source button in the upper left-hand corner and choose your DVD drive from the list. It will start scanning your DVD, which could take a few minutes.
  5. When it’s done, head to the “Title” drop-down menu in the upper left hand corner of the window. This is where you’ll select which part of the DVD you want to rip. In the case of movies, it’s usually the longest title, so just pick that one. If you’re ripping episodes of a TV show, it’s usually the 22 or 44 minute ones, and you’ll have to rip them each separately.
  6. Click the Browse button on the right side of the window. Navigate to where you want to save your movie file, and type in a file name in the box. Click OK.
  7. Next, head to the bar on the right labeled “Presets”. This is where you’ll choose what format the resulting file will be in. If you just want to watch it on your computer, the “Normal” or “High Profile” preset is fine. If you want to watch it on something like your iPod or iPhone, though, pick the correct preset from the list.
  8. Hit the Start button at the top of the window. This will take awhile, so you’ll probably want to grab a cup of tea.
  9. When it’s done, you’ll get a popup notification. From there, you can double-click on your movie file to watch it, or sync it to your device of choice. Enjoy!

Free Video / Movie Editor

http://www.videosoftdev.com/free-video-editor?AVGAFFILIATE=3305

The premium version of VSDC Video Editor is even faster thanks to integrated hardware acceleration, but this isn’t available in the free program and you won’t be able to export your project if it’s enabled. To disable hardware acceleration in the free editor, select the cog icon in the top right, click ‘Acceleration options’ and uncheck the box marked ‘Use hardware acceleration for encoding video’.

Google File Stream – Share folder

Share Google Drive Folder

  1. Open Google drive, https://drive.google.com
  2. Right click folder you want to share and click Share…
  3. Add email address of person you want to share with
  4. Click “Done”


Add shared folder to recipients Google drive folder

  1. Recipient should login into their Google drive account. drive.google.com.
  2. On the left, click Shared with me.
  3. Click the files or folders you want to add to your drive.
  4. In the top right, click Add to My Drive Add to My Drive.
  5. Click Organize.
  6. Choose the folder you want to add to.
  7. Click Move or Move here.


Download and install Google File Stream onto their computer and install